

Prerequisites
- Basic knowledge of AWS, GCP, Azure, Terraform and Ansible
- Terraform and Ansible installed in the workspace
- Have AWS, GCP and Azure accounts
- Setup authentication with AWS (using AWS CLI), GCP ( enable compute engine API and add a key to the associated service account) and Azure (use Azure CLI)
- Generate keys for the instances that we will create using Terraform.
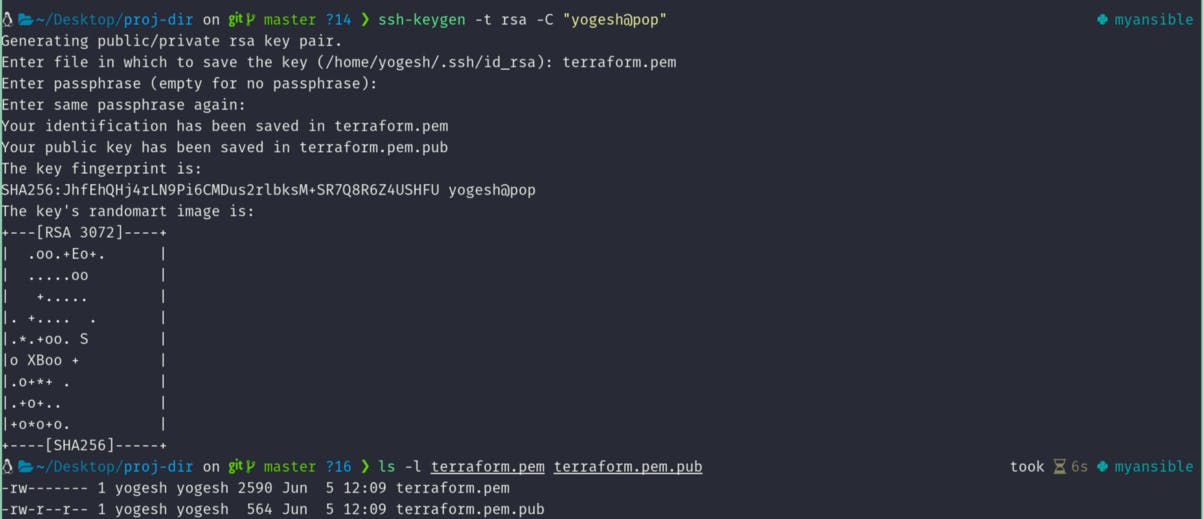
ssh-keygen -t rsa
Note: -C option is for comment. You can save it in any file you wish to, but make sure to give 644 permissions to the public key and 600 permissions for the private key. You can also choose to give 444 and 400 respectively.
- Download a dynamic inventory script for Terraform from here. Go to releases, download it and extract it as
ansible-inventoryinto your Terraform workspace.
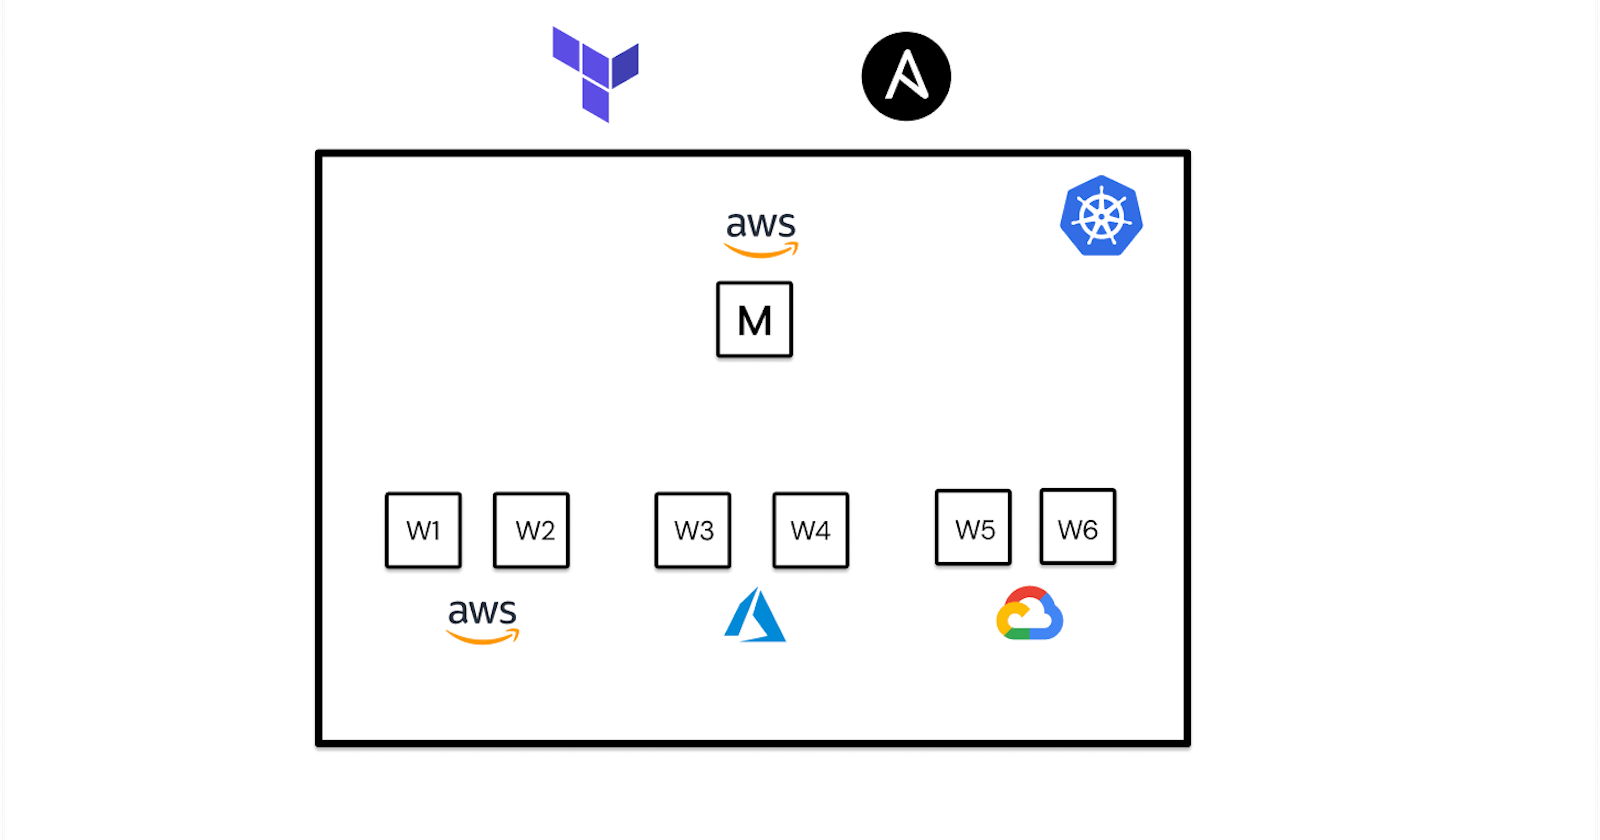
First things first, to set up a multi-cloud k8s cluster we need to provision instances. We can easily do so using Terraform.
Provisioning instances
First, you have to create a providers.tf file and add all the providers that we will be using as follows:
For the user to customize variables we created the above variables which start with var. . But we haven't defined them yet, to do so we create a variables.tf file as follows:
Since we can't determine the project name and credentials path for GCP we leave it as it is without any default value. These will be provided by the user at runtime either in a .tfvars file or while running terraform apply command. I also went on to define variables which we'll use later on.
Now we further create variables for instance key and the number of worker nodes in each cloud. We don't assign any default value for the private key path and the public key path because it changes for each user.
I'll further divide this section into 3 parts, each for configuring a different cloud.
AWS
To create an instance in AWS we need an AMI first. To make it dynamic we will use a data source with data resource as shown below:
Note: I have used Amazon Linux 2 AMI. You can use other images but keep in mind that you have to write your own ansible-playbook to configure the instance with this AMI.
Then we'll create a keypair that we can later attach to the instance
Now that we have created a keypair and data source to fetch the Amazon Linux 2 AMI we can move on to create instances. You can also create a custom infrastructure including a VPC, Subnets, Internet Gateway, Routing Tables, Security Groups (including listening only on required ports) etc… But I will just focus on creating the K8s cluster and leave the customization up to you.
I choose to create a master node in AWS. The code for it looks as follows:
Note: Make sure that your default security group has all ports open (or at least the ports for ssh and k8s).
And as for the worker nodes:
The worker nodes depend on the master node i.e. they must be created after the master node and must be destroyed before the master node. For this, we use the depends_on meta argument. We also make use of the count keyword to create the desired number of instances in this case which happens to be stored in the aws_nodes variable. In addition to this to set the name of the node we use count.index which changes in each iteration (starts from 0 and goes up to count-1).
GCP
We'll connect to the same master instance that was created in AWS and only create the worker nodes in GCP. To do so first we have to add the public key in the nodes so that we can manage them later on if needed using the private key. To achieve this in Terraform we use the help of the google_compute_project_metadata resource which adds the metadata to all of the instances. We can just add the ssh public key as follows:
Then we move on to create the actual worker nodes in GCP as follows:
Azure
In Azure, before creating the instances we have to set up the resource group, virtual network, subnets, public IP and network interface.
Now we create an instance
Now that we have all the infrastructure set up we can move on to configure the instances. To do this we use ansible, not separately but combined with Terraform. But first, we'll create directories and the necessary playbooks. Since we created the instances with 3 different types of images, I'm going to write 3 different playbooks for each of them. You can also try to create one single playbook using variables with conditional statements along with the os_distribution fact.
Configure Instances
I can again divide this into 3 sections based on the cloud we used since we decided that we would use a unique image for each cloud. Create a directory for ansible in your workspace and again create subdirectories for aws, gcp and azure as shown below. I'll get to what exactly are these files in the coming sections.
.
├── ansible
│   ├── aws
│   │   ├── configure-k8s-master.yaml
│   │   ├── configure-k8s-worker.yaml
│   │   ├── kubernetes.repo
│   │   ├── modules-load.d_k8s.conf
│   │   ├── require-config.yaml
│   │   └── sysctl.d_k8s.conf
│   ├── azure
│   │   ├── configure-k8s-worker.yaml
│   │   └── require-config.yaml
│   ├── daemon.json
│   ├── destroy-k8s-worker.yaml
│   └── gcp
│       ├── configure-k8s-worker.yaml
│       └── require-config.yaml
AWS
I'm naming the hosts as aws-k8s-master and aws-k8s-nodes for master and worker nodes respectively. I've already set up k8s cluster using ansible before on AWS but used ansible for provisioning as well. The code below is more or less similar to that, you can refer it here if you have any doubts on the below code or you can just ask in the comments. The below code should be put in ansible/aws/configure-k8s-master.yaml file.
The above code configures the master node and downloads the kubectl config file to your local system in the kubeconfig directory in your root module. Every time you create a new master with Terraform you will see that the config file is stored in a subdirectory named by the ansible host in your kubeconfig folder. Now coming to configure the worker node we will have an environment variable (flag) named IS_CONFIGURED set to 1 once we configure the node. This is required because later on we will use triggers which will configure all the nodes whenever some nodes get deleted or added. So to avoid configuring a node again and again we can have a flag setup in the form of an environment variable in all the nodes. The below code represents the idea (we will use this in GCP and Azure as well):
The above code goes into ansible/aws/configure-k8s-worker.yaml file. It just gets the environmental variable from the hosts and checks if it is 1. If it isn't 1 then it runs the ansible/aws/require-config.yaml playbook. This playbook looks as follows:
In the above file once the worker node config is done we add the environment variable IS_CONFIGURED and set it to 1.
With these, we have successfully created playbooks that can configure AWS master and worker nodes.
GCP
Since we have seen the idea of flag while configuring AWS worker node we can implement the same here. Also since we are configuring debian image in GCP the playbook slightly changes but the idea remains the same as shown below. The below file is
The actual code that does the configuration is as follows:
Azure
Similarly, for Azure we follow the same steps:
And to actually configure the instance:
Integrate provisioning and configuration management
We use the terraform-provider-ansible to create ansible host and group resources in the .tfstate and then use a dynamic inventory script which actually gets the inventory from the .tfstate. This makes creating an inventory so simple! This (dynamic script) is what you have downloaded at the beginning of the article. And also installed the ansible provider during the time of initializing providers (along with aws, gcp, azure and null). Now that we know how it works let's see it in practice:
The above code creates hosts with public IPs of the instances. This resource is especially helpful because of its ability to maintain different vars for different hosts. Using this we can maintain different credentials for different clouds. The below code groups the hosts created above:
Now that we have added them to the inventory it's time to run the playbooks against them, which can be done as shown below:
In the above code, the configuration of the master node depends on aws_instance.k8s_master and ansible_host.aws_k8s_master resources because to configure the instance the master node must exist in the first place and must be in the inventory for ansible to perceive it. It's almost similar for the worker nodes in all the clouds except that it also needs the master to be configured and it should re-run the playbook against the new node once a node joins. For this, we use triggers, though it runs the playbook whenever a node leaves or joins against all the nodes. To rectify this unwanted behaviour we used the IS_CONFIGURED environment variable if you recollect.
Although you may think it is done now, it is not, we still haven't considered the case where we want to resize our cluster nodes. When we delete and add the nodes the k8s cluster won't allow you to add nodes with the same name again. So when we delete the nodes we must gracefully remove them from the k8s cluster. This can be done using kubectl command as shown below:
With this playbook, we can gracefully remove the node from the cluster. All we have to do now is to add this into the terraform code. This can be fit into the respective instance resource itself using the when = destroy condition of local-exec provisioned. So finally the code for all instance resources looks as follows:
You can also configure some more things perhaps try parameterizing other variables to make it more customizable by the user, changing architecture, try adding multiple master nodes for HA, opening specific ports for enhanced security, changing hostname so that the nodes are more readable in the cluster and so on.
The entire code is available on my GitHub
- Note that this is not recommended for production considering the latency and data transfer charges using different clouds
Thank you for reading up to this point!